Kubernetes Overview.
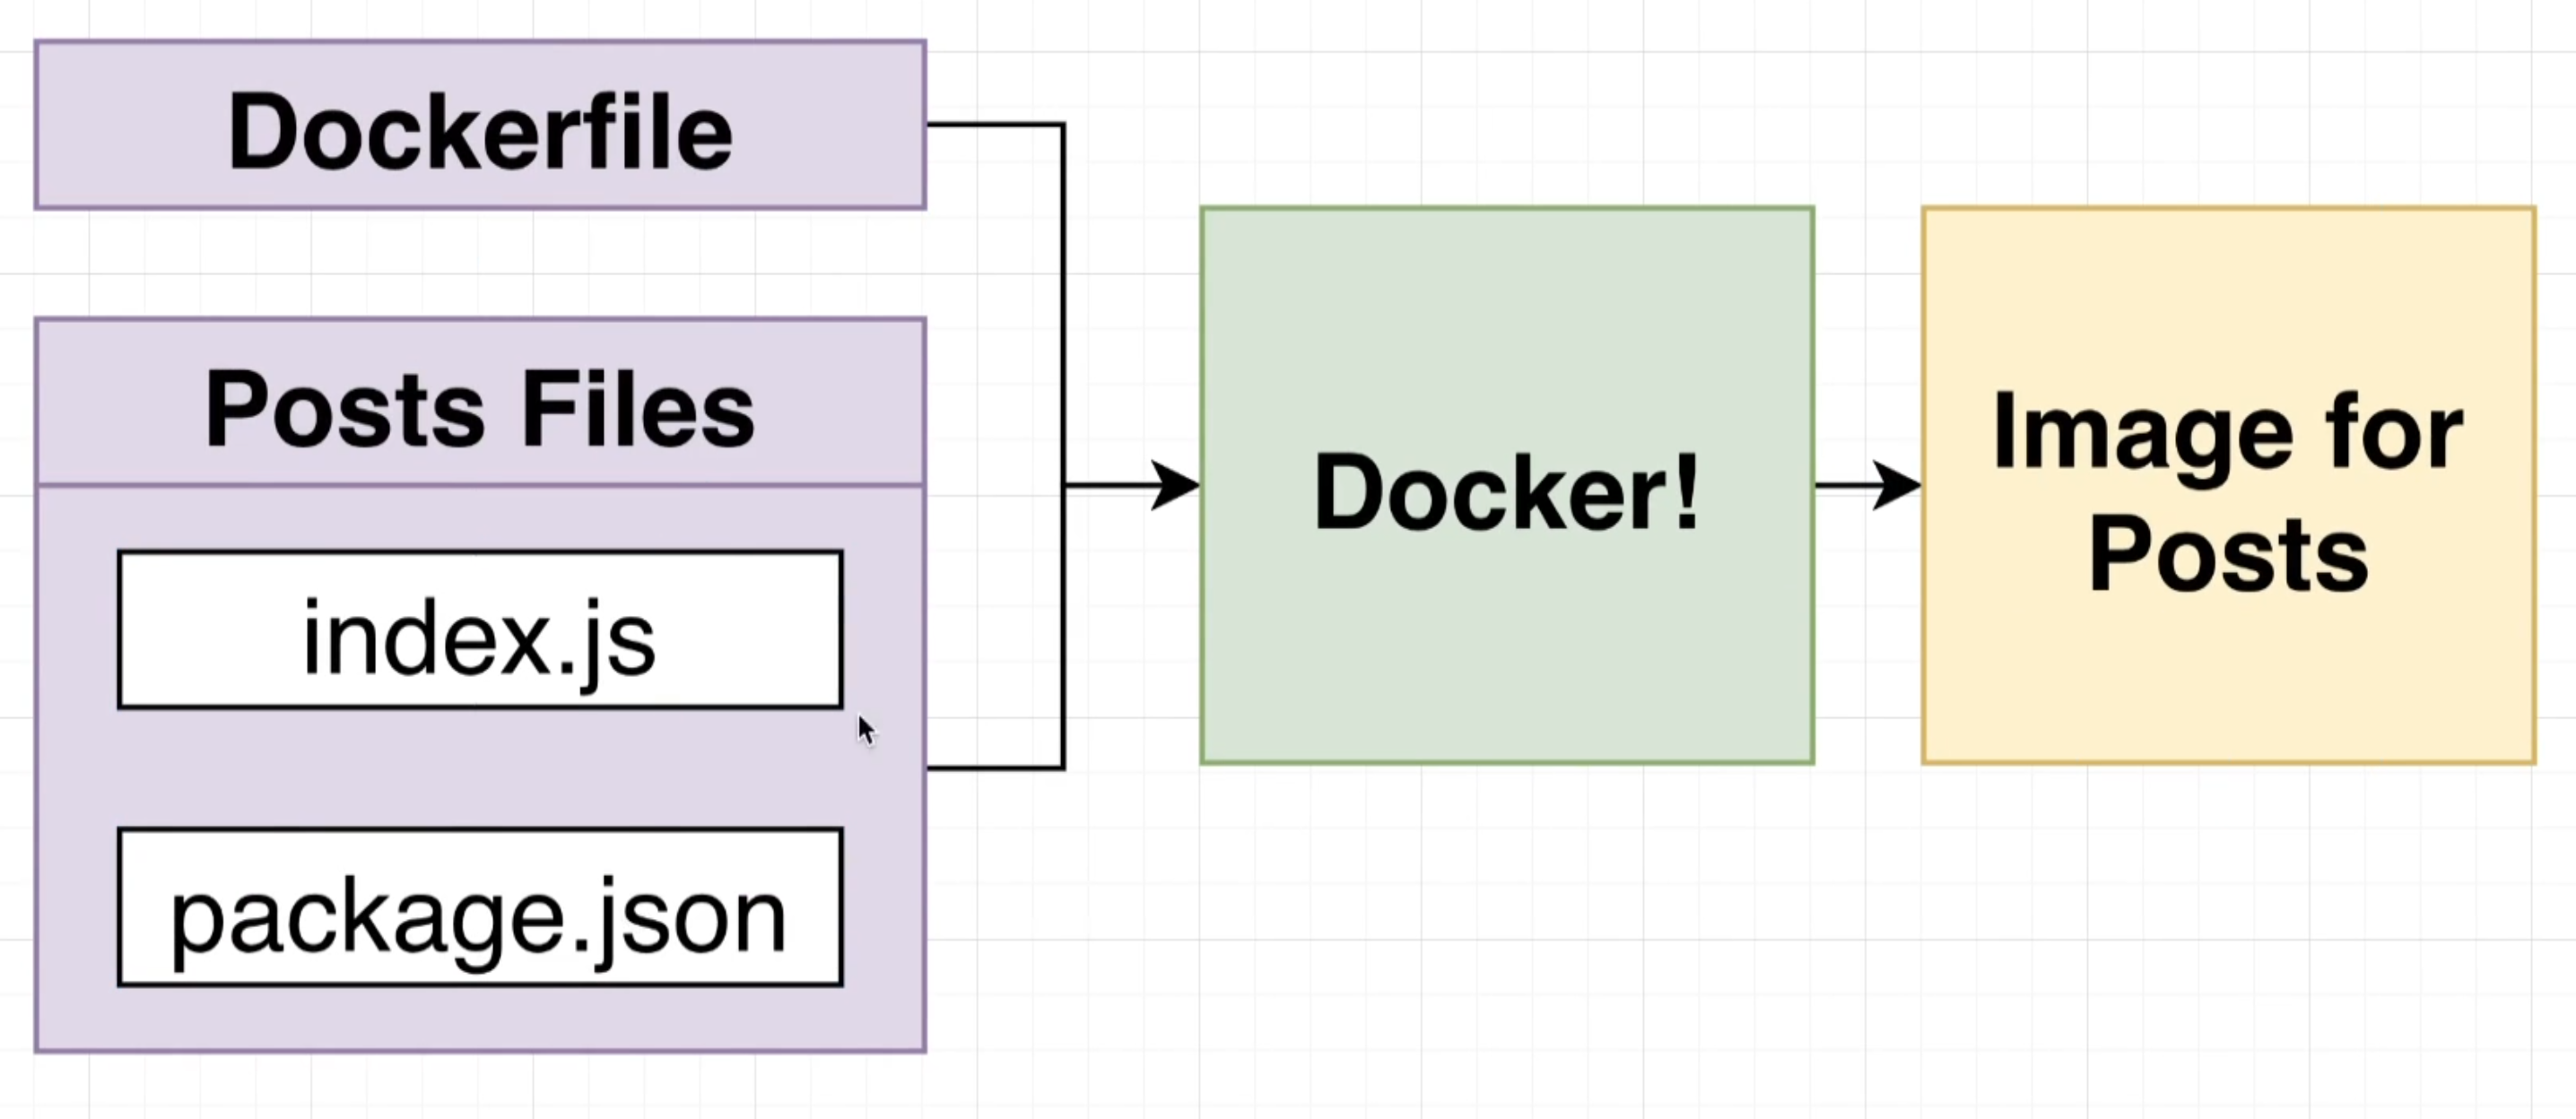
Before we start dealing with kubenetes we need a ready docker image. In the below image we've got some javascript files and a Dockerfile. We took all these files feed them to docker and created a image. We can not create any instances or containers of this image.
Enable kubenetes Docker Dashboard > Setting > kubenetes > Enable Kubenetes switch
Kubernetes Terminilogy.
Cluster
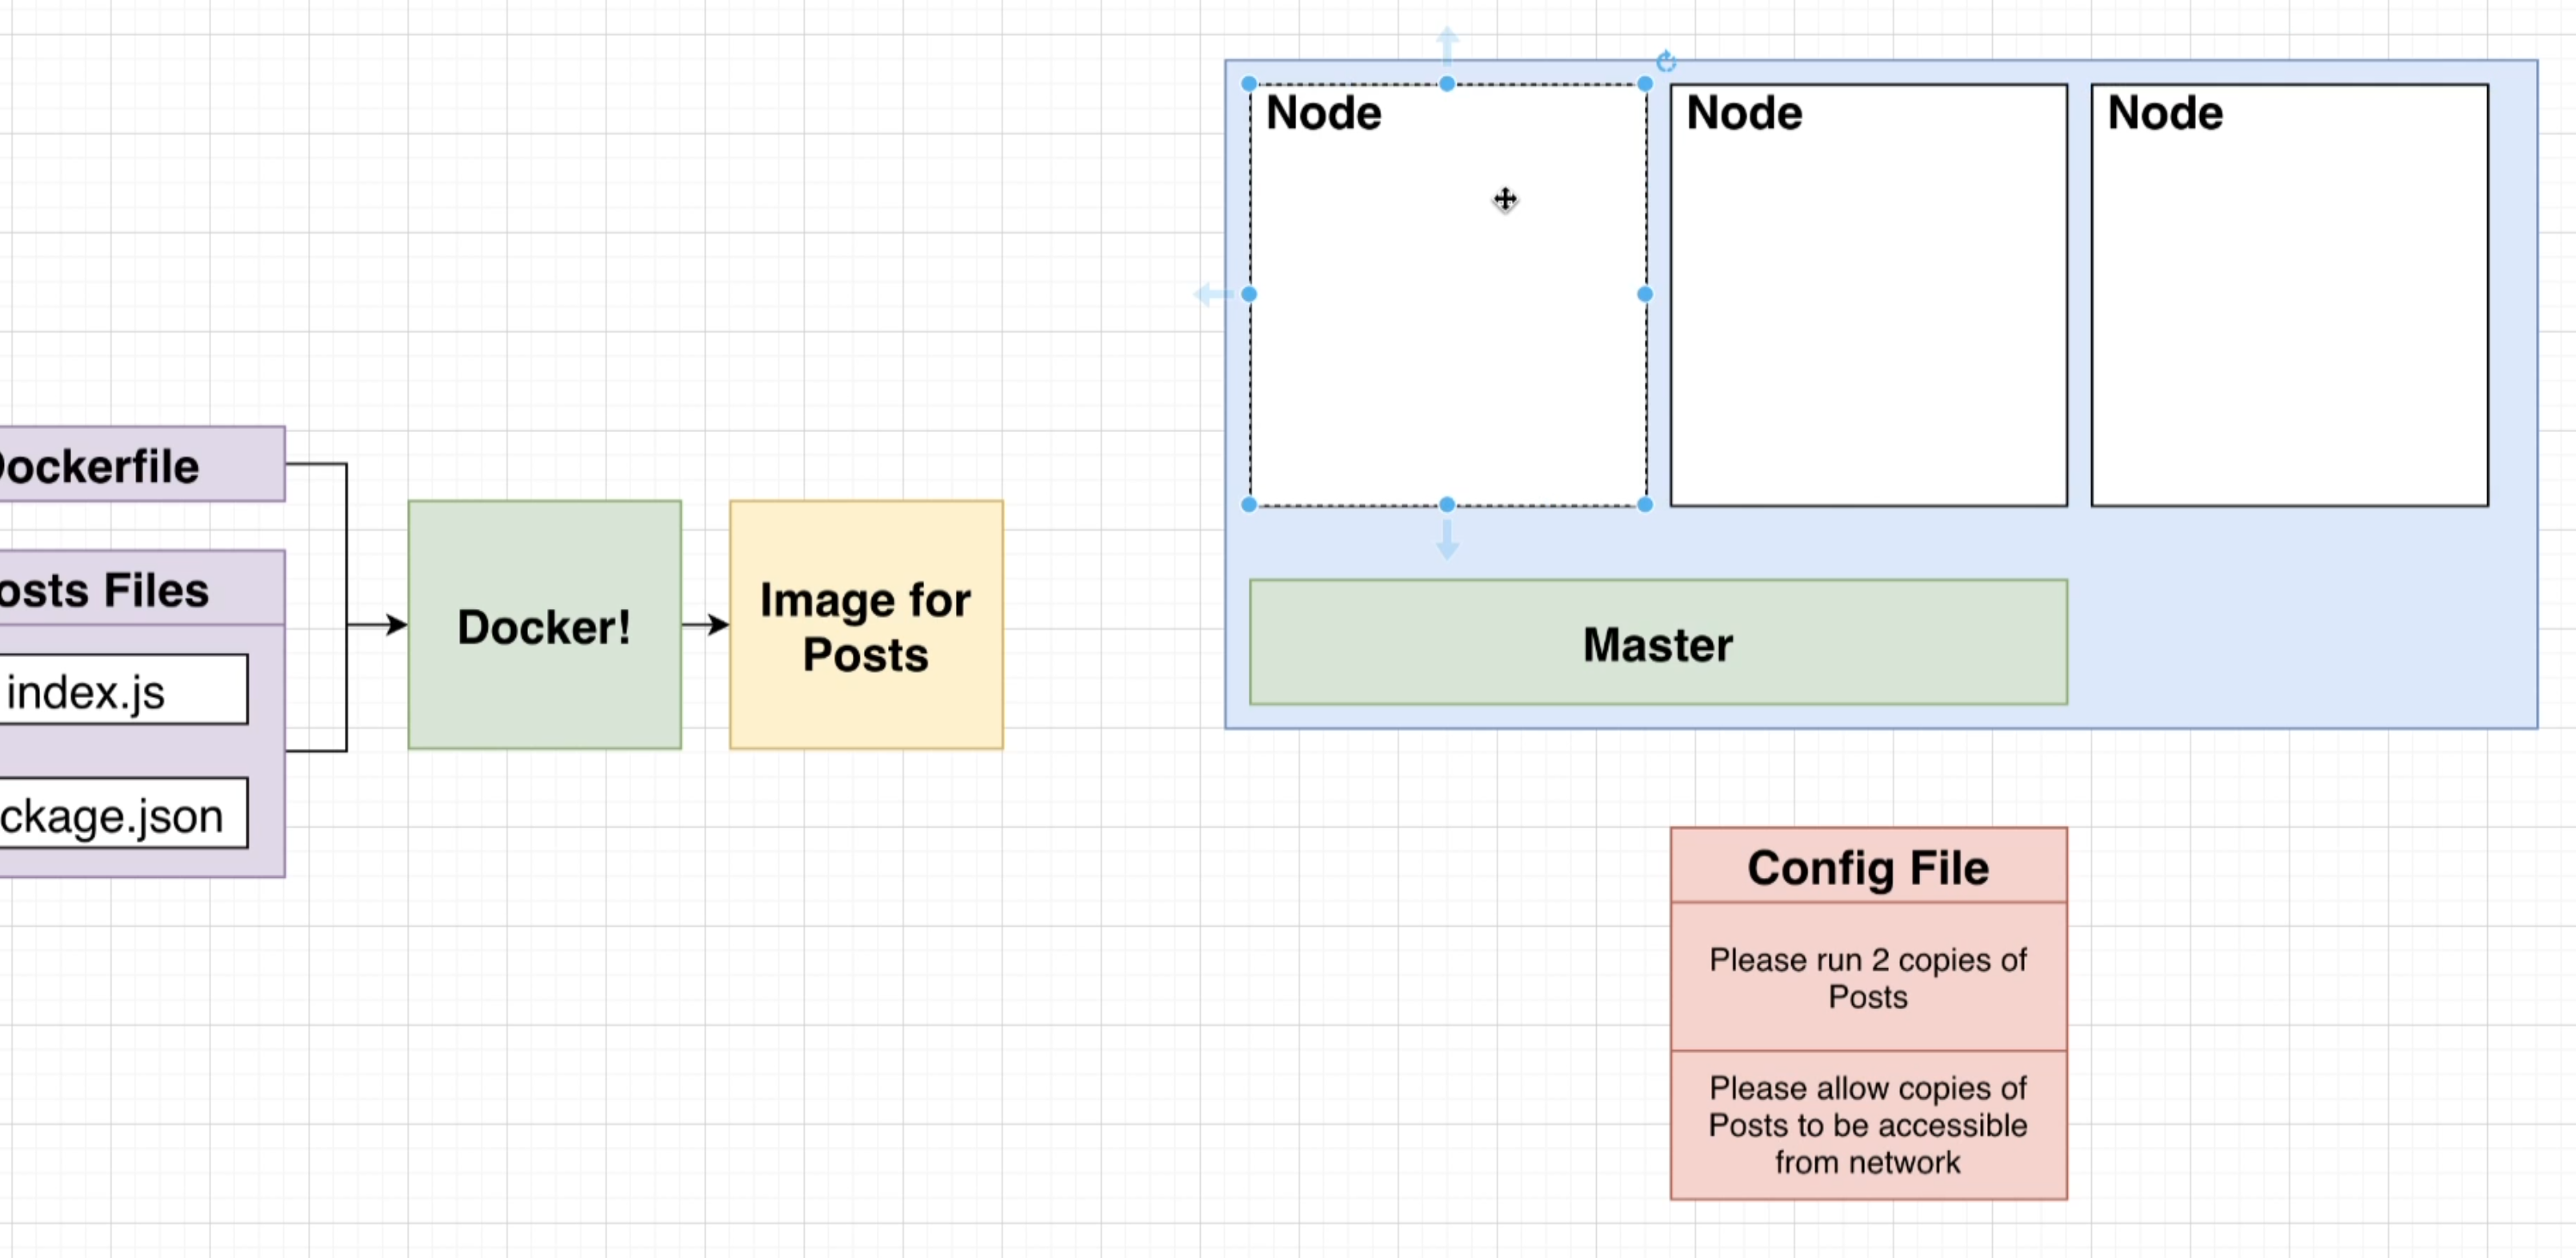
A kubenetes cluster is a collection of nodes and a master to manage all of them. This is a entire set of infrastructure that is going to run our code. Whenever we want to use kubernetes we always should have a set of images ready to go. We now deploy this images in the kubernetes cluster. In the below picture the blue box denotes kubernetes clustor.
Node
A node is a virtual machine that runs all the different containers that we throw at our kubenetes cluster. A single cluster might have multiple nodes assigned to it. It might only have one node. In the below picture there are three separate nodes being shown. A node is a virtual machine essentially a computer that is going to run some number of container for us.

Now if you are running kubernetes in your local computer. It is extremely likely you are running only one node by default. It is only once we start deploying to some cloud provider then we are going to have multiple nodes.
Pod
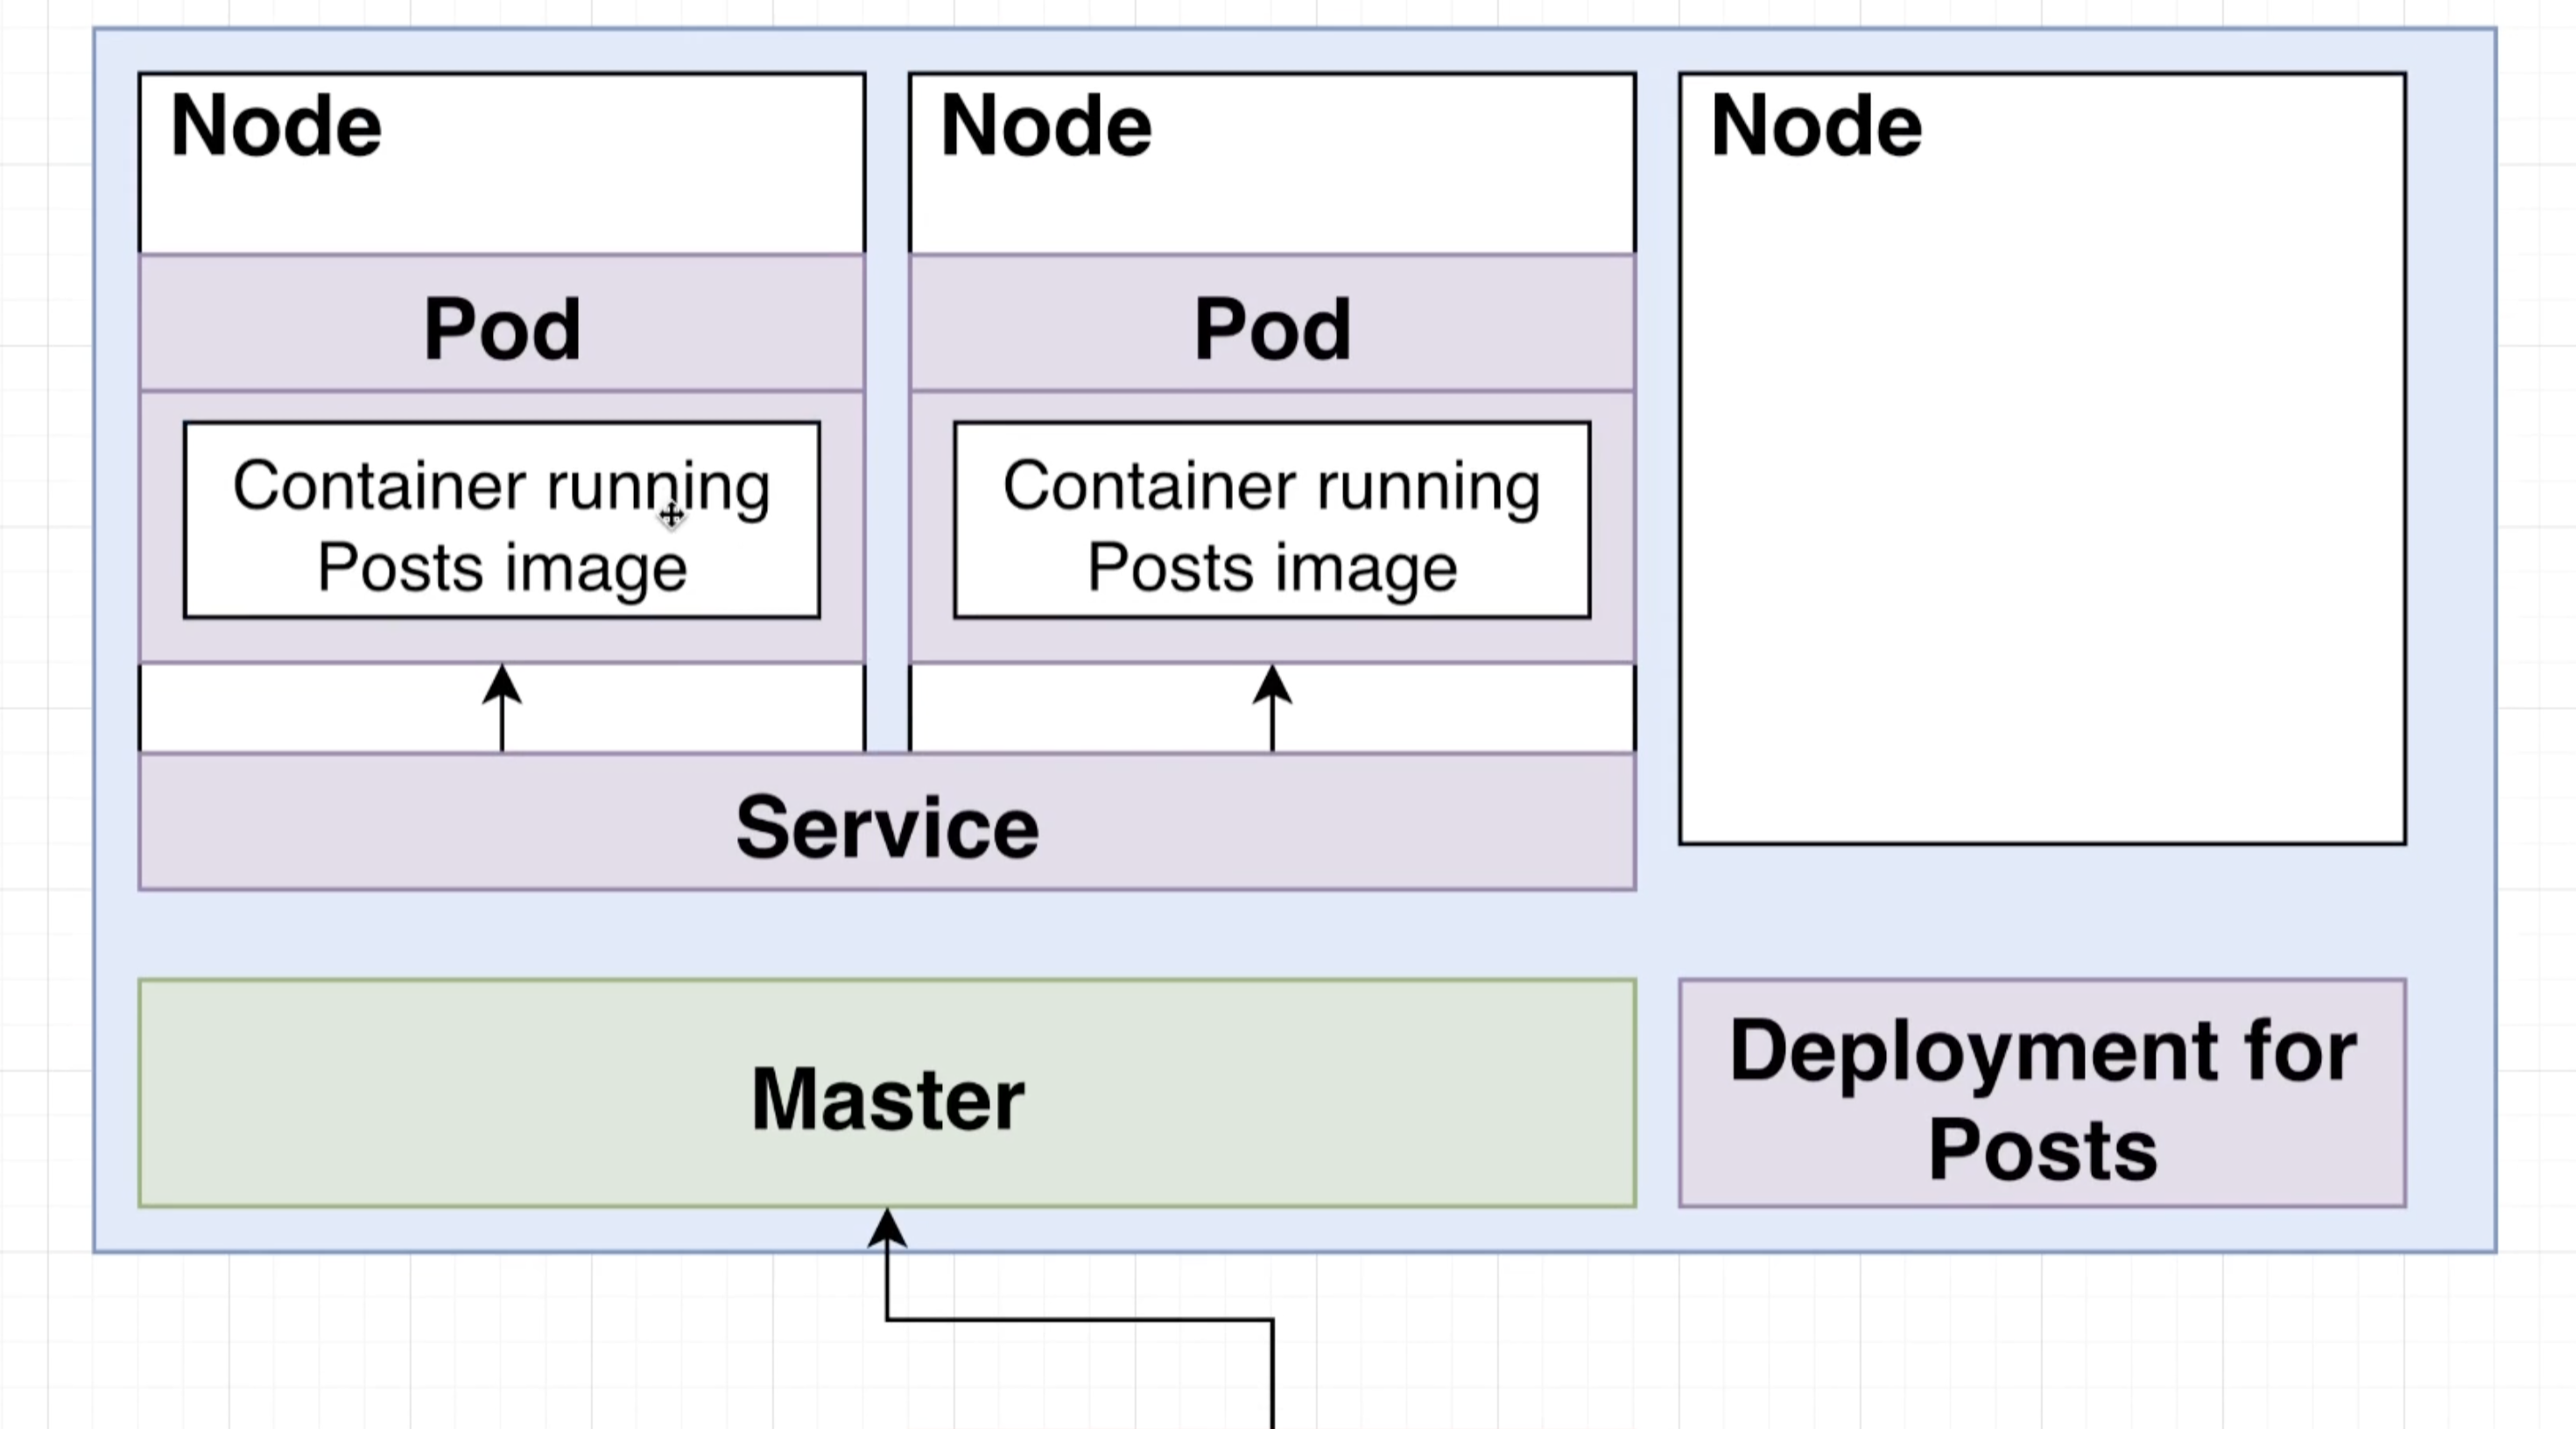
A pod is something that wraps up a container or it can wrap multiple differnet containers together.
After it find the instructed image it will create 2 containers (because we asked for 2) and put them on the available node.
Each container that is created is hosted withing something called Pod
A Pod technically wraps up the container and it also can have multiple containers in it.
# look for the default v1 kubenetes list of objects
apiVersion: v1
# type of object that we want to create.
kind: Pod
# options that we provide object that we are going to create
metadata:
    name: transit

spec:
    containers:
        - name: transit-container
          image: reponame/transit:0.0.1
kubectl get pods
kubectl describe pod [pod name]
You can also login to your pod's container.
kubectl get pods # copy the pods name
kubectl exec -it [pod_name] sh
Deployment
In order to manage the pods and containers kubenetes also creates something called a deployment. This deployment is going to be incharge of managing both these pods. If anything ever goes wrong with this pod for eg: crash or stops running. That pods will automatically get recreated by
the deployment.
Depoloyment monitors a set of identical pods (Pods that are meant to run the same container inside them). If anything ever happens to that Pod for eg: if it crashes the deployment will automatically restart that pod for us.
Services
kubectl get services
kubectl describe service [service name]
In the kubenetes file we also write instruction asking for network accesibility from other pods or container inside of kubenetes clustor.
To do so kubenetes create something called service. The service gives us access to running pods or container inside of our cluster.
A kubernete service provide easy to remember URL so that other running pods or container can very easily access another each other. Below is the overall diagram of everything combined
Networking with services
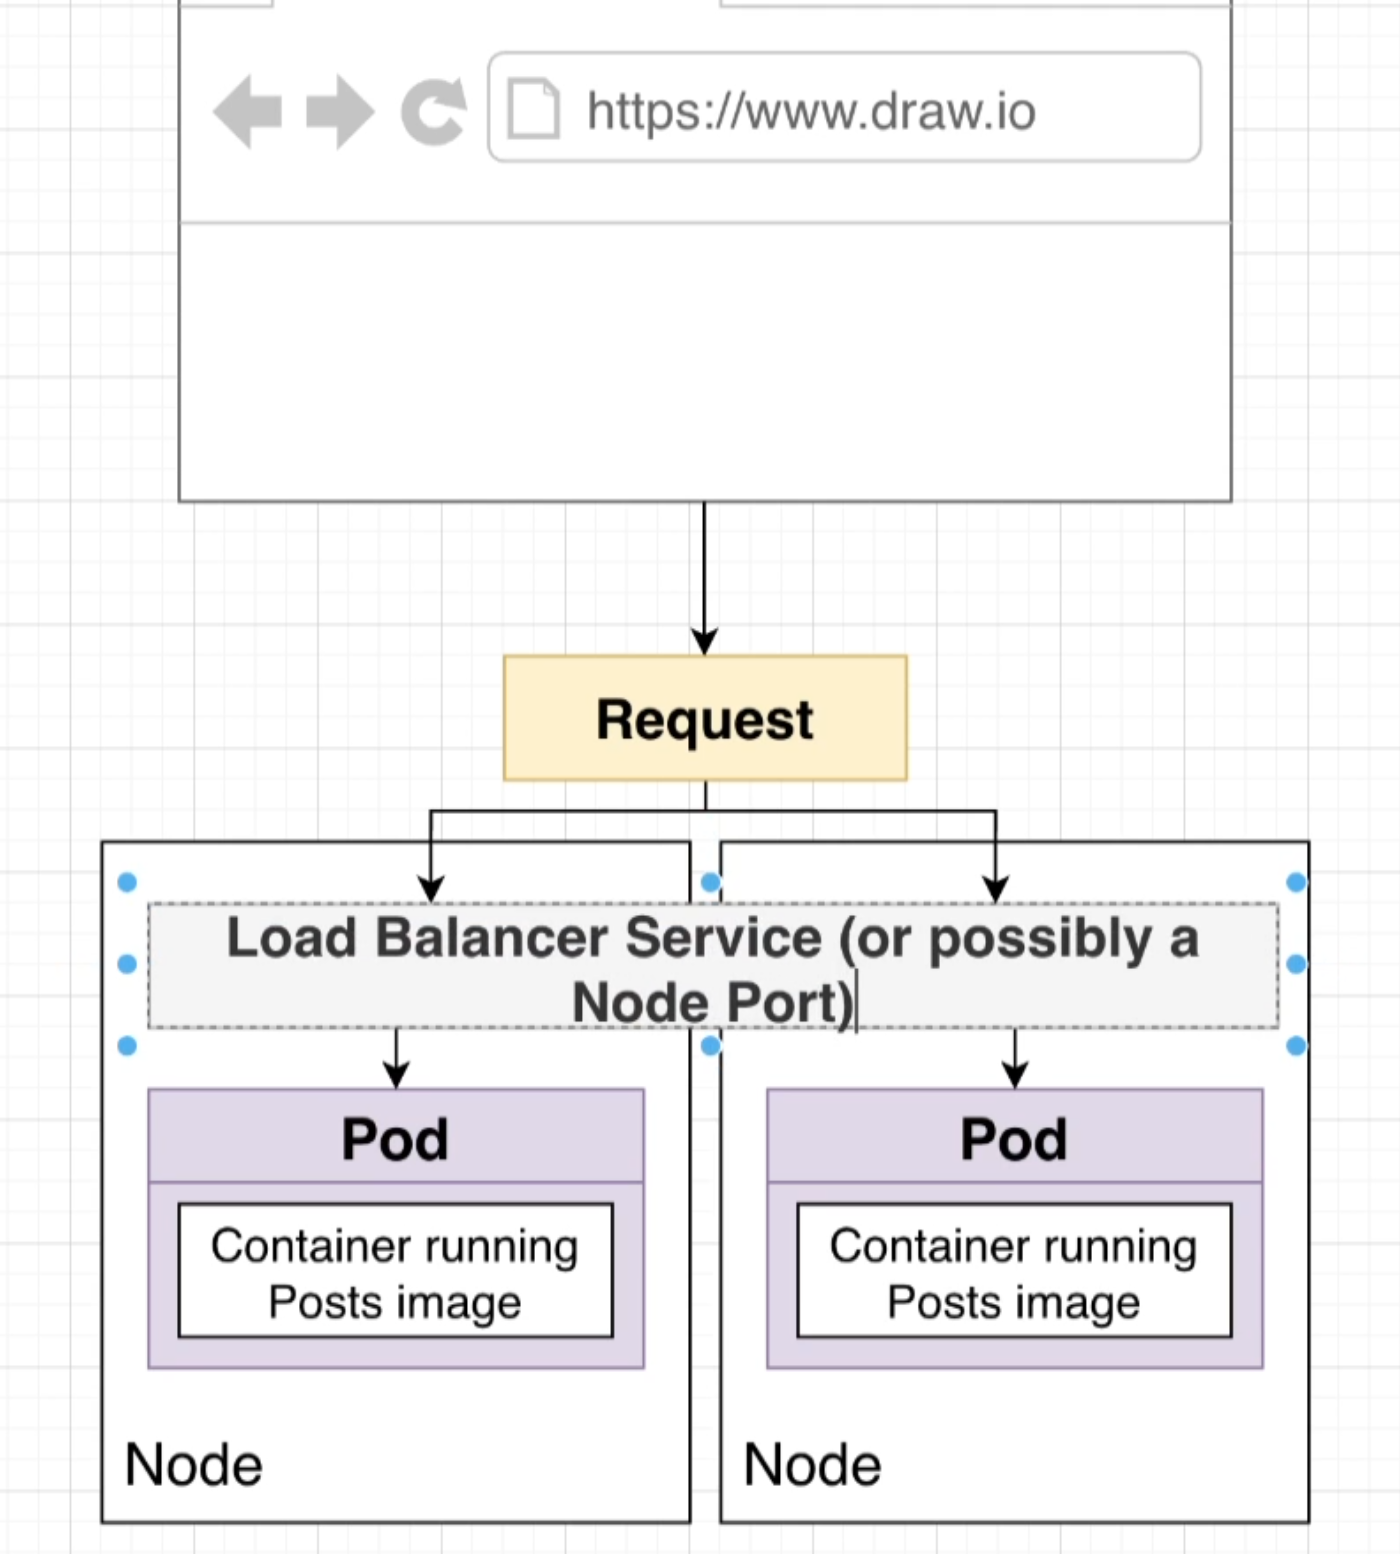
Once we have our pod is running with a container, inside this container is our application. Now at this point we should be able to make request to this application running in the container. This is where we utilize services. We build services using a config file just like deployments and pods.
Types of Services
- Cluster IP : are used anytime we want to setup communication between different pods inside of our cluster.
- Node Ports : are used anytime we want to access pod from ouside of our cluster. This is only used for dev purpose.
- Load Balancer : This is the right way to acess pod from ouside of cluster. Kind of similar to node ports however different in many kind.
- External Name : Redirects an in-cluster request to a CNAME url....
Load Balancer (Ingress Nginx)
Install Ingress Nginx (opens in a new tab)
kubectl apply -f https://raw.githubusercontent.com/kubernetes/ingress-nginx/controller-v1.12.0-beta.0/deploy/static/provider/cloud/deploy.yaml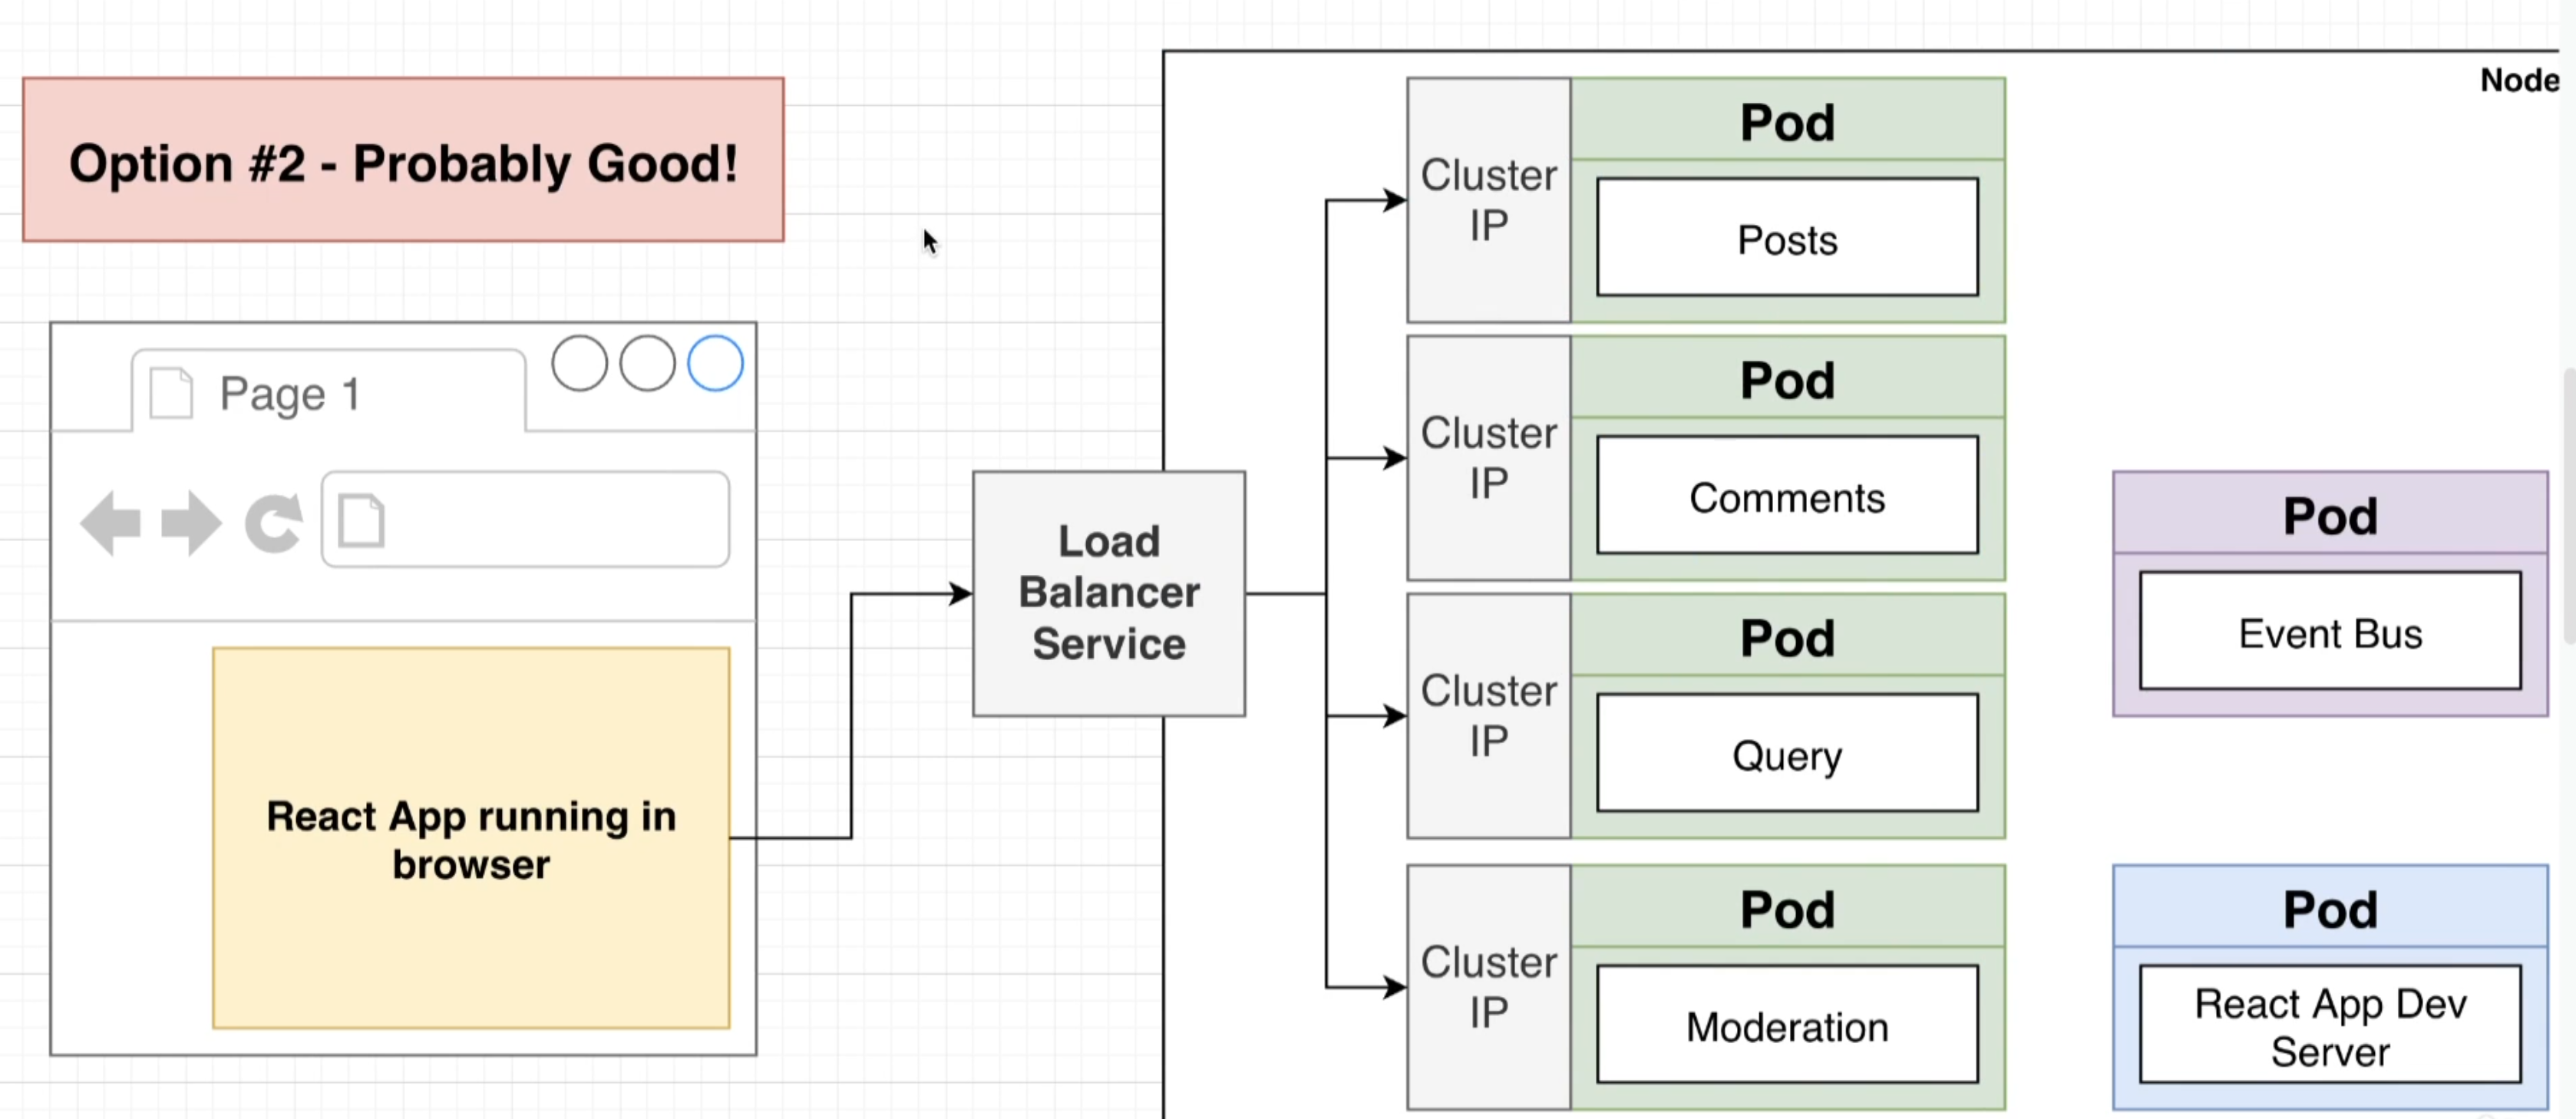
Config File
The config is a YAML file that tells kubenetes about different deployments, pods and services that we want to create. This always resides in project's codebase and commit to gihub. Config files provide a precise definition of what your cluster is running.
In order to create a container out of the image we first need a config file.
In this configuration file we are going to write directions for kubernetes eg: create 2 copies of a particular image, allow the copies of image accessible from network
Now with the given instruction kubenetes is going to search for the provided image referenece. First it is going to search image in the docker daemon running withing the local machine. If not available it will search on dockerhub.
Common Kubernetes commands
kubectl apply -f [config file name]to create a Podkubectl get podsList out all the available podskubectl describe pod [pod name]print out inforamtion about running podkubectl exec -it [pod_name] [cmd]Execute given comman in a running podkubectl logs [pod name]print out logs of the given podkubectl delete pod [pod name]delete a pod.kubectl get ingressCheck Ingress statuskubectl describe ingress ingress-servicekubectl get pods -n ingress-nginxEnsure the nginx ingress controller is actually runningkubectl get endpoints [service name]Verify Service Endpointskubectl toptool to monitor resource usage
Scaffold
This is a command line tool which we are going to use to automatically spin a different type of task in our kubernetes cluster. This also ensures the codes are updated in the running pod as you make changes to them. This makes it easy to create/delete all the objects tied to a project at once.
brew install skaffold

skaffold # verify skaffold is installed.
Skaffold instruction is also a set of instruction given via a yaml file. Anything written on skaffold does not directly get applied to kubenetes.
apiVersion: skaffold/v3
kind: Config
manifests:
    # this is telling skafold in this directry we have all different kubertenes configs
    # Skafold is going to watch for the changes made on the files withing in directory.
    # It will also delete all the configs asscoaiated whenever we stop skafold.
  rawYaml:
  - ./infrastructure/k8s/*
build:
  local:
    push: false # do not allow skaffold to push image to dockerhub whenever a change is made
  artifacts:
    # the artifacts is a array
    - image: eAcademyNepal/transit
      # transit below here is the directory where we have all our code any changes done in this directory at ('src/**/*.ts'),
      # the skaffold will throw this file that was updated directly into the pod.
      # the skafold makdes sure that the pod always have the latest code.
      # If any changes made that does not match the src below, skafold will try to build a image. for eg: installing a new dependency which will make changes to package.json file.
      context: transit
      docker:
        dockerfile: Dockerfile
      sync:
        manual:
          - src: 'src/**/*.ts'
            dest: .
deploy:
  kubectl: {}